
How to Create the Perfect GIF in Photoshop
There are loads of down to business approaches to make a GIF on your PC, mainly using little dedicated applications intended for that reason. However, in the event that a freeware application can do it, at that point Photoshop can most likely improve, and in the event that you as of now have Photoshop on your computer, at that point there’s no requirement for you to introduce whatever else if you need to make GIFs.
Here we’ll tell the best way to make GIFs in Photoshop – both out of a video file and out of a series of pictures that you can join together into a GIF.
In this article, you will learn-
Turn Video into Images
First up, in case you’re hoping to turn a video – or part of one – into a series of GIFs, you’ll have to bring that video into Photoshop as a progression of layers. (In case you’re transforming singular pictures into a GIF, you can jump to the next heading.)
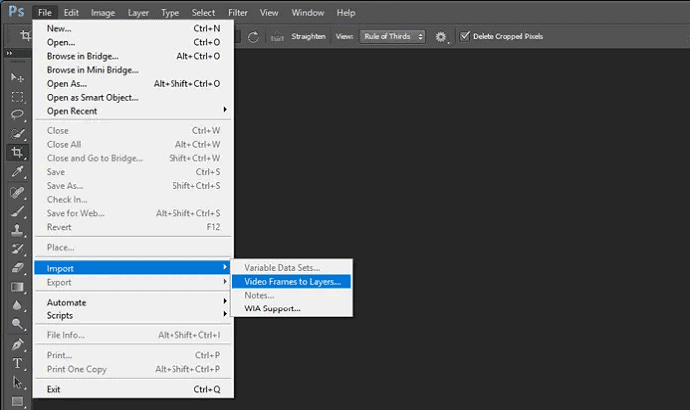
Open Photoshop and snap “File – > Import – > Video Frames to Layers.” Select the video you want to turn into a GIF.
In the window that opens, you can click “Selected Range Only” and utilize the slider to trim it to simply the piece of the video you’ll need to use for your GIF. You can likewise cleave down the number of casings you import by restricting the import to each “x” frame.
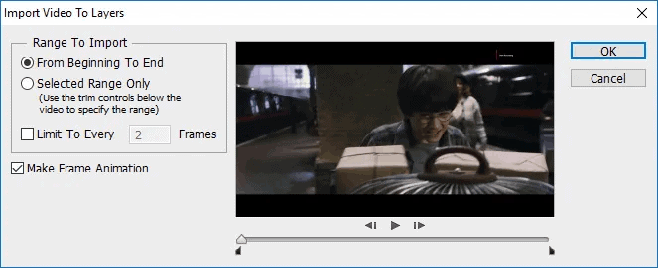
At the point when you’re prepared to change over the video to layers, click OK.
Make GIF in Photoshop Using Multiple Images
Discover all the pictures you need to use as a grouping in your GIF activity (except if you’ve just included them by changing over a video). In a perfect world, you ought to have the pictures in a similar envelope on your PC and arranged in the request you need them to show up in the GIF activity (however this isn’t basic, as you can reorder them in Photoshop).
Next, open Photoshop and add the picture you need to show up first in your GIF movement. You can simply relocate it into the Photoshop window, or go to “File- > Open in Photoshop.”

With your first picture in there, you would now be able to choose the remainder of your pictures all the while (or individually), and drag them onto the picture you as of now have open in Photoshop. They should all show up as layers in the equivalent Photoshop venture. (You may need to press Enter for everyone in Photoshop to put the files.)
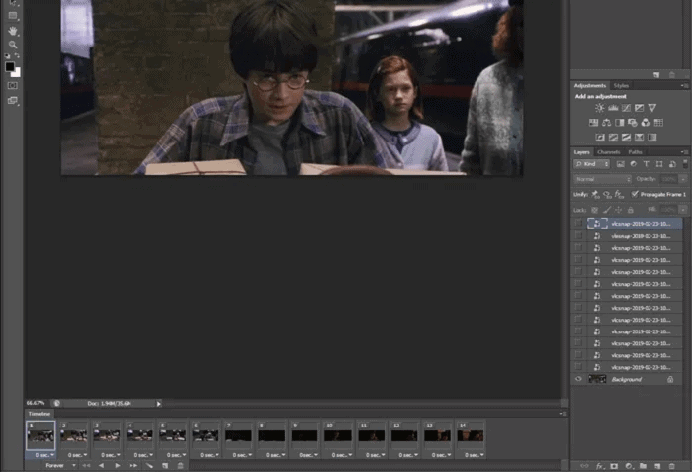
You ought to have a Timeline window stumbling into the base of Photoshop. If not, click “Window – > Timeline” to make it appear.

Snap the little symbol with the bolt and four lines at the furthest right of the Timeline window, at that point “Make Frames From Layers.” This will add every one of your layers to the timeline animation.
You can reorder them by hauling the thumbnails around and review the liveliness by tapping the play symbol in the timeline window
By default, the animation will loop continually. Snap the Forever symbol, and you can transform it to circle only a single time or multiple times on the off chance that you’d like.
If the animation is moving excessively quick for you, you can expand the postponement between the frames. Select all the casings in the course of events by tapping the first, at that point holding Shift while tapping the last one.
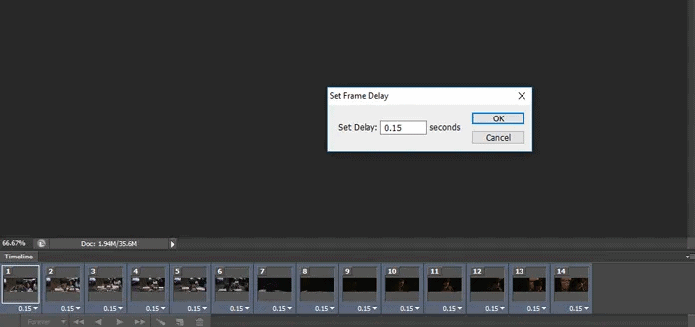
With all the frames chose, click the time underneath any of them to change the edge delay for every one of them. In the event that you click “Other” in the defer choices, you can set more explicit postpone times. Here we went for “0.15,” which appeared to be perfect for this animation.
See which one suits you by playing the casing liveliness each time you change the deferral.
You can likewise change the casing postponement to being between explicit edges by choosing them separately in the timetable and changing their deferral there.
Save GIF Animation in Photoshop
To spare your GIF movement, go to “File – > Save for Web.”
In the “Put something aside for Web” window, click the “Preset” drop-down, and select “GIF 128 Dithered” for the highest caliber. Vacillating is the cycle by which a picture design with diminished shading profundity, (for example, a GIF) is given the hallucination of shading profundity by making specks to smooth the limits between colors.
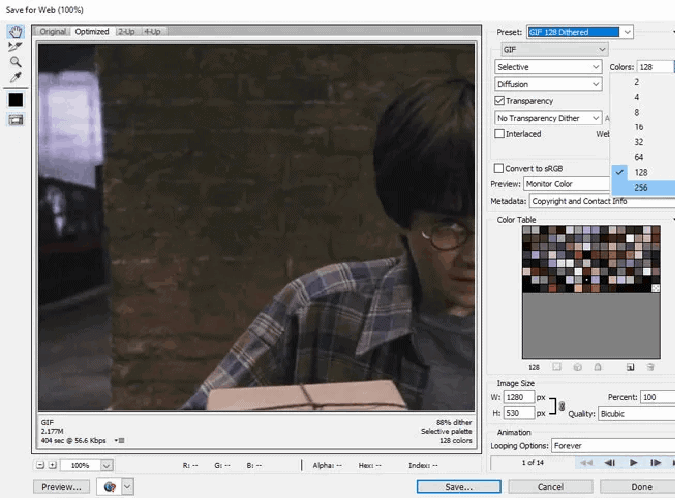
In the Save for Web window we likewise suggest evolving “Hues” to 256. Changing the picture size measurements will likewise bigly affect the document size, so you might need to contract it to make the GIF littler and simpler for individuals to see on the web.
At the point when you’re set, click Save and you have your GIF!
Conclusion
Photoshop may not be as straightforward a method of making a GIF as a portion of those lightweight applications, however, it offers a lot more alternatives to make your GIF look and play only the manner in which you want it to. Also, Photoshop skills are pretty convenient by and large, so it’s an extraordinary method to continue acquainting yourself with this software.
Please feel free to give your comment if you face any difficulty here.

