
How to Remove a Background in Photoshop
Here’s the manner by which to remove a background in Adobe Photoshop in clear step-by-step instructions anybody can follow.
Adobe Photoshop is extraordinary for altering photographs, as its name recommends. There’s a variety of things you can do in Photoshop, running from shading redresses to honing foggy edges. You can likewise eliminate background in Photoshop, so in this article, we disclose how to eliminate background in Photoshop.
In this article, you will learn-
Stage 1: How To Remove A Background In Photoshop

The primary thing you have to know is that removing a background is never going to be simple. It will consistently by tedious, regardless of what direction you attempt it (and there are a few different ways).
In case you’re going along with us for this instructional exercise, we will accept that:
- You approach Photoshop.
- You’ve used Photoshop previously.
To remove a background in Photoshop, you need the correct kind of picture: only one out of every odd picture will work. Pick something with high difference esteems and more keen edges.
Set Up Your Quick Selection Tool

There are several distinct approaches to eliminate background in Photoshop. The primary way we’re going to attempt is my undisputed top choice: the Quick Selection Tool.
This strategy is direct however intensive. To begin, go to your Quick Selection Tool, situated in the left-hand toolbar. It will be gathered with the Magic Wand Tool.

The Quick Selection Tool figures out what to choose dependent on:
• Your shading test.
• What is close to that shading test.
• The edges of shading inside your picture.
• The “central” point in your picture.
Yes, it’s that keen.
When you pick Quick Selection Tool, you’ll see its controls spring up along the head of your screen.
Ensure Auto-Enhance is turned on. Auto-Enhance allows Photoshop to accomplish all the more adjusting along the edges of your choice, which is something to be thankful for to have if your edge has a ton of bends or subtleties to it.
Next, press Select Subject.
Select Subject tells Photoshop to choose the most command thing in your image. This will be simpler for the program to get in the event that you’ve picked a picture where there is a reasonable front, center, and back.
Make Your Selection

When I press Select Subject, Photoshop chooses the top of my light. You can see the blueprints of this choice by the line of “walking ants” around it.
This choice isn’t great, as it just chose an aspect of my light and a portion of the background. However, finishing up your choice is important for the game and this is an extraordinary head start.
At the head of the screen, ensure your Add to selection alternative is dynamic. Next, click and drag from your choice along with the remainder of your light. Photoshop will realize what to choose depending on the hues underneath it and the edges of your past choice.
Before the end, the greater part of your light ought to be chosen.

When your determination is made, you should use the Lasso Tool (found in the left-hand toolbar) to rapidly streamline the edges.
I use the Add to selection alternative for the Lasso, at that point draw along the edge of my choice to make it look less spiked. It will get little regions of pixels that the Quick Selection Tool has missed.

One thing to note is that removing a background – and using the Lasso Tool – is a whole lot simpler in case you’re working with a pen and tablet. It gives you more noteworthy hand-to-eye coordination.
If the sum total of what you have is a mouse, in any case, there’s as yet an approach to clean up your choice. Simply use the Polygonal Lasso Tool, as it depends on snap and drag stay focuses to make straight-edged determinations.
With the Lasso Tool, you need to draw everything by hand.
Remove Your Background

When your selection is as you would prefer, return to your Quick Selection Tool. Mouse over your choice, at that point right-click.
Pick Select Inverse.
By choosing Inverse, Photoshop will choose everything in your picture aside from your primary object.

Next, go Edit > Cut. At the point when you press this, Photoshop will delete your experience all at once. This is the means by which to eliminate a background in Photoshop.

A while later, you’ll see a gray and white checkerboard region that shows that the space around your item is straightforward. Since you’ve eliminated your experience, in any case, you may see that a portion of the edges around the object is still harsh.

To additionally refine your edge, head toward your Layers board and include a layer of strong shading underneath your picture. This shading is anything but a lasting aspect of your picture: it’s only there to enable you to alter. You can switch its permeability “off” when you’re not altering.
For this layer, it’s ideal to pick a shading that stands out pointedly from the extra “bits” you have around your picture. I’ve picked a brilliant blue, since blue tends to “vibrate” when set close to a splendid red and makes it simpler to see.
Next:
- Click on your picture layer so it’s active.
- Go back to your Lasso or Polygonal Lasso Tool and select the unpleasant pieces around your light that you need to dispose of.
- Click Edit > Cut to eradicate them.
Stage 2: How To Erase A Background In Photoshop
In case you’re searching for a snappier method to eliminate background in Photoshop, at that point possibly you need to eradicate a picture background.
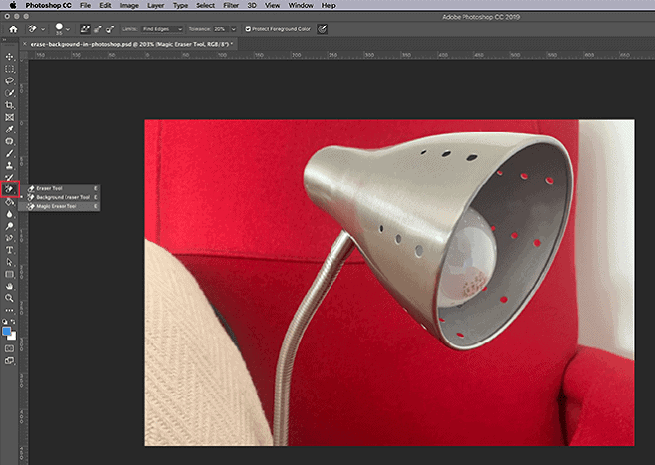
There are two eraser tools that function admirably for this. You’ll discover your erasers along the left-hand toolbar, seen here in red.
The Magic Eraser Tool

The first tool you’ll need to give a shot is the Magic Eraser Tool. To use the Magic Eraser, go to your eraser symbol, click on the little white bolt to access to the dropdown menu, at that point pick the fitting tool.
The Magic Eraser Tool is unbelievably simple to use. It tests the shading that is under your cursor, at that point deletes all pixels that are a similar shading: both those that are under your brush and any pixels close by.
By basically tapping on the red seat behind my light, you would already be able to see that I’ve deleted a huge lump of my experience. How about we continue clicking.

As referenced, removing a background in Photoshop will never be great. After you’ve disposed of a large portion of it, you’ll despite everything have some little zones that weren’t picked up.
To eradicate these areas:
- Select your Lasso Tool.
- Make an enormous choice of your experience, straightforward territories notwithstanding.
- Go to Edit > Cut.
This will erase not only the areas you can see, yet the minute 1-2 pixel tests that have been left finished. It makes for a clearer picture.

Once again, If you need to zoom in and truly calibrate stuff, initiate that strong shading layer underneath your picture to build the complexity. At that point reactivate your picture layer, zoom in, and use the Lasso Tool to choose and cut.
The Background Eraser Tool

The second apparatus that you can use is the Background Eraser Tool. It’s finicky and not as snappy, so I don’t use it again and again. At the point when I do, I use it for close detail work.

At the point when you click on the Background Eraser Tool, you’ll see its controls spring up along the head of your screen. This is the place you can alter its settings, and we suggest that you do it.
The most significant settings to remember:
• Your brush symbol, seen here as a white circle.
• Your Limits. Close to this, you will discover a dropdown menu with three alternatives to control what gets deleted:
o Find Edges deletes shading regions that are next to each other, yet keeps the “edges” of items inside your picture.
o Contiguous deletes a tested shading and all the hues close to it.
o Discontiguous deletes your tested shading, however just when it goes underneath your brush.
Next to Tolerance, you’ll see a slider that you can change. The lower the rate, the pickier Photoshop will be while choosing which hues to eradicate. On the off chance that you set the Tolerance excessively high, it will eradicate related hues, as well – not simply the ones you needed to erase.

When you’ve balanced your controls, you can begin eradicating. In the event that you look inside my blue box, you can see the Background Eraser Tool in action.
Despite the fact that my brush is as of now over the lamp, the eraser device is just eradicating the red pixels while leaving the light unblemished. This is on the grounds that I have Find Edges turned on, and it has identified an edge.
Once again – after you’re finished eradicating – you can return in with your Lasso Tool and tidy things up.
Stage 3: How To Remove A White Background In Photoshop

Imagine a scenario in which you need to remove the white background in Photoshop?
Ensure your picture is in its own different layer. Next, ensure your differentiating shading layer is underneath your image.
Go to one side hand toolbar and click on the Magic Eraser Tool. Enact your image layer, at that point click anyplace on the white inside that image.
Photoshop will consequently eliminate all the white in your experience since it was one persistent “shading”. Indeed, it’s that basic.

When your background is removed, turn on your strong shading layer to check and check whether any edges should be fixed. They’ll appear as a slim white line around your object.
After you’re finished fixing these edges with the Lasso Tool, turn the permeability on your shading layer off.

At the point when you remove a background in Photoshop, you can either include another background or keep it straightforward.
To keep your background straightforward, go File > Save As, at that point pick PNG as your record design. It will protect the straightforward edges in your picture.
Please feel free to give your comment if you face any difficulty here.

