You’ve likely been using Windows 10 for quite a while now, yet that doesn’t mean that you’ve found all that it has to bring to the table. The operating system is pressed with highlights, yet there are some that are hidden away to the extent that they could be considered secret.
Windows 10 can record a video of your screen without third-party software. Here’s the manner by which to discover and use Windows 10‘s easy-to-use Capture utility to record your display.
The Game Bar Isn’t Just for Gaming
Windows 10’s screen capture tool is part of the Xbox Game Bar. Notwithstanding what the name infers, the Game Bar is for something beyond gaming. In this guide, we’ll be using it to make screen recordings.
The tool will capture a video of your screen in H.264 MP4 format.
Screen recording is part of the “Capture” widget, which is gotten to through the Game Bar’s “Widget Menu” highlight. To use the Widget menu, you’ll need Windows 10’s May 2019 update or later.
Step by step instructions to Launch Screen Capture on Windows 10
To start with, press Windows+G to dispatch the Game Bar. Then again, you can open the Start menu and dispatch the “Xbox Game Bar” application.
(On the off chance that the Game Bar overlay doesn’t show up, head to Settings > Gaming > Xbox Game Bar. Ensure that the Game Bar is switched “On” here. You can likewise check the keyboard shortcut—you can switch “Open Game Bar” to any key mix you like rather than Windows+G.)

In the Game Bar overlay screen, search for the “Capture” window.
On the off chance that you don’t see it, click the Widget menu symbol on the left. It would appear that few lines with bullet points to their left.
A drop-down rundown will show up; click “Capture.” The “Capture” shortcut may likewise be in the Game Bar toolbar.

Step by step instructions to Start Recording Your Screen
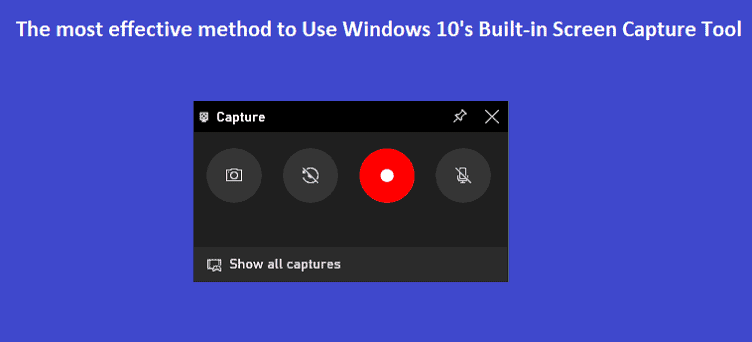
Search for the “Capture” widget window in the overlay. There are four catches on the Capture widget (from left to right):
• Screenshot: Takes a screenshot of the active window.
• Record most recent 30 seconds: Creates a recording of the past 30 seconds.
• Start recording: Starts recording your active window.
• Turn on mic while recording: If this choice is enabled, Windows 10 will capture audio from your PC’s mouthpiece and remember it for the recording.

You’ll see text under the catches. This is the means by which you’ll understand what the active window is, otherwise known as what will be recorded. For instance, in case you’re browsing the web, it will show the title of the open tab.

To begin recording your screen, you should initially choose whether you need to use your mic, which is useful in case you’re attempting to clarify something on the screen.

Next, essentially click the Start Recording button.

The screen recording will start, and you’ll see a little toolbar show up toward the edge of the screen. It will show the running season of the recording, and it additionally has catches to stop recording and toggle the microphone.

At the point when you’re done, click the Stop symbol to end the recording.

From the Capture widget, click “Show All Captures” to see your recording.

Your recording will be at the top of the list. Click the folder symbol to see all recordings and screenshots in File Explorer.
These recordings are stored under your Windows user folder at C:\Users\NAME\Videos\Captures by default.
Coincidentally, you can likewise begin recording your screen by squeezing Windows+Alt+R or by default. Head to Settings > Gaming > Xbox Game Bar to tweak these keyboard shortcuts.

That is it! Who realized Windows had a particularly basic screen recorder implicit? Presently you do.
Please feel free to give your comment if you face any difficulty here.

