Creating a t-shirt design & mockup
This online class will walk you through the way toward making a baseball shirt plan and mockup in CorelDRAW, including the logo, text effects, and sizing
In this article, you will learn-
Document Setup
To make another record, go to File > New. Set the page size to Letter, the direction to Landscape at that point click OK.
A normally used shading palette for screen printers is the Pantone® spot color palette. How about we likewise open that palette to have it helpful as we are designing.
• Go to Window > Dockers > Palettes.
• In the docker, click on the bolt close to Palette Libraries to grow the determination.
• Then grow Spot > Pantone > Pantone+ and select Solid Coated-V3.

The palette will show up on the right of the interface however we should put it along the base. Snap the spotted region at the head of the palette and drag it to the base of the CorelDRAW window. At the point when you see the bar turn dark, given up and it will connect to the interface.
We will likewise turn on the Document palette by going to Window > Color Palettes and choosing Document Palette or by checking it in the Palettes docker.
Importing images
Let’s start by importing the colored shirt our plan will go on. Go to File > Import and peruse to the area on your computer where you have spared the file, at that point click Import. To put the picture in your report, drag to draw a square shape on the page at that point discharge and the shirt picture is presently in your archive. You can expand it if you like by hauling out one of the corner handles.
TIP: Before we go any further, it’s a smart thought to spare your file now, and intermittently all through the design process.
Setting a Background Page Color
Presently we should make a foundation shading on our page that is a similar shading as the shirt picture. This will assist us with perceiving how the ink hues we pick will look against that shading.
• Select the shirt with the Pick tool and get the shirt out of the way of the page.
• Double-click on the dark shadow at the edge of the report to open the Document Options window (or go to Layout > Document Options).
• Click on Background in the left segment.
• Choose Solid and snap the dropdown bolt to choose a shading.
• Click on the Eyedropper symbol in the base right corner of the shading window and snap on the shirt to test the shading.
• Uncheck Print and export background then click OK and our page color is set.

Next, import the baseball picture. This record is a bitmap and most screen-printing shops favor vector craftsmanship so we will require to convert it to vector using the PowerTRACE feature.
Use the Pick apparatus to choose the baseball and afterward click the dropdown bolt next to Trace Bitmap in the property bar. At that point pick Outline Trace > Clipart. Since the baseball picture is enormous, an exchange box will spring up proposing you diminish the size, so click on the Reduce Bitmap button.
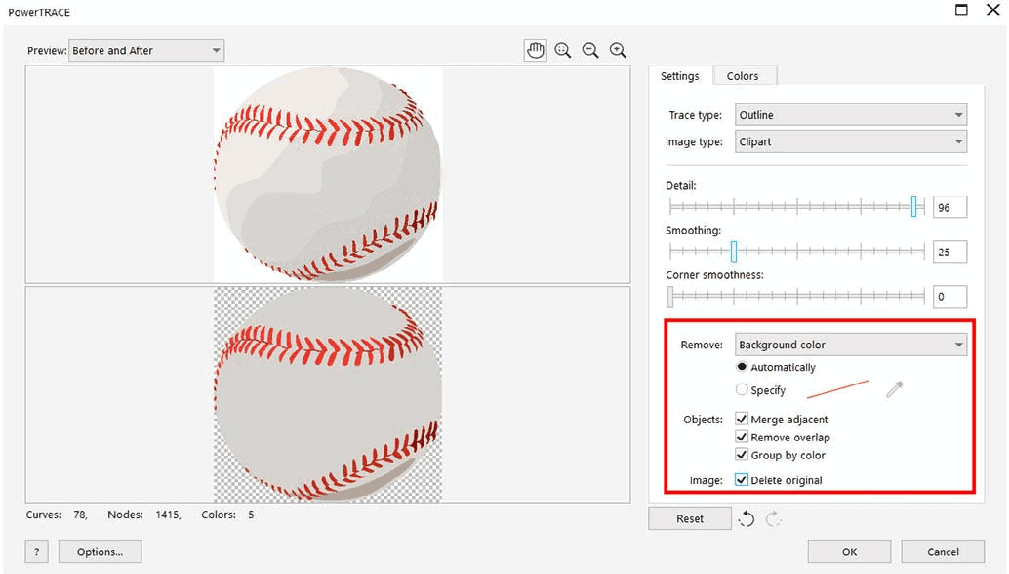
The PowerTRACE window will open and you will see the top picture is the first bitmap and the base is the trace result.
On the Settings tab pick these choices:
• Remove: background color
• Objects: Merge adjacent, Remove overlap, and Group by color (this allows you to handily change a gathering of articles from an RGB or CMYK shading to a Spot shading and get them all simultaneously)
• Image: Delete original – we needn’t bother with it any longer
Presently click on the Colors tab so we can roll out certain improvements in here. To begin with, you have the choice to change the Color Mode to Pantone Solid Coated. This will spare time and permit you to change over the whole picture to spot hues.
Next, we have to disentangle our hues by consolidating them. To blend the red hues:
• Select the main red shading on the rundown, hold down the SHIFT key, and select different reds.
• Click the Merge
• Repeat this cycle for the dark hues at that point click OK.

We’d prefer to change the shades of the baseball so it is white rather than dark, with an alternate shade of red for the lines.
• Select the baseball and snap the Ungroup symbol on the Property bar. This will isolate the dark ball and the red join.
• Select the dark ball at that point click the White sample on the Pantone shading palette we put at the base of the interface. This will change the ball to white.
• Press the Tab key on your console and now the red join will be chosen.
• Click the Bright Red sample on the Pantone shading palette. This will change the shade of the fastens.
• Use the Pick tool to lasso the baseball, which will choose both the ball and stitches objects..
• Click the Group Objects symbol in the Property bar to refocus the baseball into one object.

Including and Manipulating Text
To include text, select the Text apparatus on the left toolbar then snap on the page and begin composing. For this plan, we composed TIGERS in capitalized.
Presently select the Pick instrument and use it to resize and reposition your content as you like. You can make it bigger or littler by hauling one of the corners handles in or out. Or then again stretch it taller by utilizing the top place handle.
Utilize the textual style dropdown rundown to change the text style in the event that you wish. For this plan we needed something heavier (American Captain Eternal textual style).
Now, use the Pick apparatus to decrease the size of the baseball and move it under the content, so the design now like this.

Presently we will give our content a custom shape using the Envelope tool. To include an envelope:
• Open the Envelope docker by going to Effects > Envelope or Window > Dockers > Effects > Envelope.
• Select the content with the Pick
• Choose the Single-arc mode from the alternatives at the base of the Envelope docker and afterward click the Add New catch.

• You will currently observe a white ran fringe around your content to speak to the envelope.
• Use the handle in the center base of the content and pull up to make the content circular segment.
• You can shift back and forth between using the Pick instrument to alter the width and stature of the content and Envelope apparatus to change the circular segment until you are content with the results.

• To make the content orange select the content with the Pick apparatus and snap the Orange 021 pattern on the Pantone color palette.

We likewise added a shape impact to our TIGERS text. To include a form:
• Open the Contour docker by going to Effects > Contour or Window > Dockers > Effects > Contour.
• Under Contour arrangement, pick the Outside contour
• Under Corner, pick the Mitered corners
• Adjust the Offset value if you wish (we used 0.14″).
• Under Color blend, set the Fill to dark at that point click Apply.
When you are content with your form impact, go to Object > Break Contour Apart.
Snap outside the page to deselect, at that point select the dark form as it were. In the Pantone shading palette, click on the Black sample to change the shade of the contour.

Next, we add the content BASEBALL to our plan, using similar strides as while including the TIGERS text. When you have the content estimated and situated as you like, click on the Black pattern in the Pantone shading palette to make the BASEBALL text precisely the same shading as the shape of the TIGERS text.
We additionally added a white layout to the BASEBALL text by right-tapping on the White sample in the Pantone shading palette. At that point double tap on the blueprint shading sample in the Status bar that is under the base shading palette. This will open the Outline Pen window, where you can set the Width to 8 and include a check next to the choices Behind Fill and Scale with the object.

To enhance our design, we will add a few stripes to the TIGERS text.
• Select the Freehand device and use it to draw an essential stripe shape.
• Click on the Pantone Black pattern to fill it with dark.
• To adjust the stripe shape, click on the Shape apparatus and use it to move the hubs to change the shape.
• To include more stripes, select the main stripe with the Pick tool and copy it utilizing the + key on your console. You can likewise copy objects utilizing Ctrl + D or go to Edit > Duplicate.
• Use the Pick tool to resize, reposition, or pivot the copy stripes everywhere on over the TIGERS text.
• You can use the Shape tool to adjust the state of certain stripes, so they don’t all appear the same.

When we have all the stripes made, we can utilize the PowerClip highlight to put the stripes inside the TIGERS text, so there are no stripes staying outside the letters.
• Use the Pick tool to rope all the stripes, at that point click on the Group button in the Property bar.
• Right-click on a stripe and pick PowerClip Inside.
• Your cursor will change to a bolt shape – utilize this to tap on the orange content.
• Now the stripes will be “cut” inside the orange content.
Concluding the Design
Our design is almost finished, yet we have to ensure that all items are appropriately adjusted and that the plan is the correct size for printing.
To start with, use the Pick tool to rope the TIGERS text and afterward click the Group Objects button on the Property bar. Presently the content, form impact, and stripes will be adjusted as a group.
• Use the Pick Tool to move the TIGERS text, baseball pictures, and BASEBALL text until you are content with the planned course of action.
• Lasso the whole plan at that point go to Object > Align and Distribute > Align Centers Horizontally, or just press C on your console.
• Group your design using the Group Objects button on the Property bar or press Ctrl + G.
• On the Property bar, ensure the Lock Ratio setting is on then enter 10″ in the Object size width field (10″ is a typical youth size screen print).

Making a T-shirt Mockup
We will make the mockup on another page in this archive. To include another page, right-click on the Page 1 tab at the base of the archive and select Insert Page, or snap on the Add Page symbol just to one side of the Page 1 tab.
• Select the shirt picture that we imported toward the start of this task and duplicate (Edit > Copy or Ctrl + C) at that point glue (Edit > Paste or Ctrl + V) onto the new page.
• Go back to page 1, select the plan and duplicate it.
• Go to page 2 and glue the plan.
• Use the Pick tool to resize and reposition the plan on the t-shirt.

You currently have a shirt plan you can scale to any estimate, vector workmanship for a screen printer, and a mockup to show how you need it.
Preparing for print
To impart this record to a screen printer or another seller, you should send out report as a PDF.
• Go to File > Publish to PDF and pick the area where you need to spare the record.
• Click on the PDF preset dropdown and select Prepress.
• Click the Settings catch to open the PDF Settings
o On the General tab, you can set the Export range to the current record, current page, or select pages.
o On the Objects tab, make a point to empower Export all content as curves. This will guarantee that the content will be appropriately shown, regardless of whether the individual you send it to doesn’t have the text styles you used.

Snap OK at that point click Save. Presently your file is prepared to email to the screen printer or other vendor.
Thanks for watching! We hope you found this tutorial helpful and we would love to hear your feedback in the Comments section below. And show us what you’ve learned by sharing your photos and creative projects with us.

