How to Make an eCard in CorelDRAW
If you are looking to make your own ecard (electronic card) it is generally basic and it is an extraordinary method to allow you to feature your imagination. Track with as we tell you the best way to make an ecard in CorelDRAW.
In this article, you will learn-
1. Set the page size
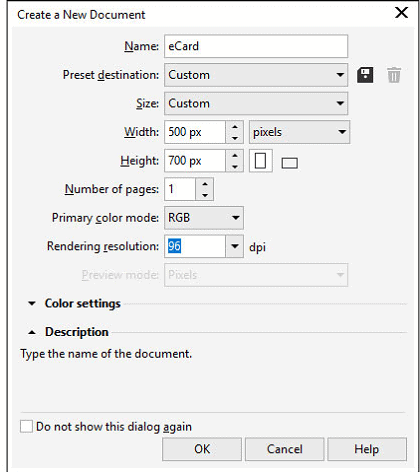
While making an ecard, the size is in pixels as it is shown on a screen. In CorelDRAW, we will set the page size using the Preset destination of Web. Set the Width to 500 and the Height to 700. You will see that the unit of measure is pixels and the Rendering goal is 96 dpi. Snap OK and spot a vertical rule by hauling from the ruler on the left. Carry the rule to the mid-point in the document.
2. Make the background for the card
We will begin with a solid color background, so double tap on the square shape apparatus in the toolbox. This will include a page outline. Presently, left snap on a pink shading in the shading palette on the right. Presently we will tap on the Transparency tool in the toolbox on the left and afterward in the Interactive Property bar, select Vector Pattern Transparency. Presently from the Transparency picker select an example that you like. We additionally need to make a square shape on the base portion of our ecard that will have a white fill and adjusted corners. You can use the Shape tool for this. When you have done that, convert it to a transparent object with a transparency of 40%.

3. Import other elements
Presently that our ecard is done, there are a few choices. You can share the file with friends or you can sent the document with an individual message to that somebody uncommon. If you need to send it with a message, it is only a question of choosing the text tool from the toolbox. Left snap in the white square shape that you made and draw a book outline. Type your message into this text frame.
4. Sharing your ecard
When the card is finished it is as straightforward as trading the document out as a png and afterward connecting it to an email. At the point when you send out as a PNG, try to choose the plan and in the Export exchange box select, Selected only. On the next screen, essentially click OK.

make-ecard-3

Thanks for watching! We hope you found this tutorial helpful and we would love to hear your feedback in the Comments section below. And show us what you’ve learned by sharing your photos and creative projects with us.

